

Autel DS808K is the same as DS808 and can replace autel MS906 and DS708
But when getting this scanner, how do we use it ?
Since it is with 7-inch LCD touch screen, so no need use laptop to operate
Just connect it with car models you want to test.
When connecting with Power, the display showed as following
Long press the Lock/Power button on the top right of the Display Tablet to
switch the unit on. The power LED light will illuminate green. The system
boots up and shows the lock screen. Slide the Lock icon to the left to enter
the MaxiDAS Job Menu or slide to the right to unlock.
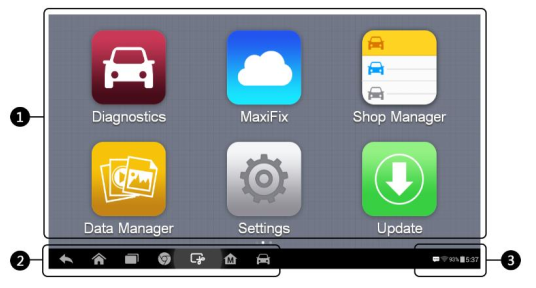
1. Application Buttons
2. Locator and Navigation Buttons
3. Status Icons
For Diagnosis
There are two options available when accessing the Diagnosis section:
1. Auto Scan – starts auto scanning for all the available systems on the
vehicle.
2. Control Units – displays a selection menu of all available control units of
the test vehicle.
After a section is selected and the tablet establishes communication with the
vehicle, the corresponding function menu or selection menu displays.
Figure 4-9 Sample Main Menu26
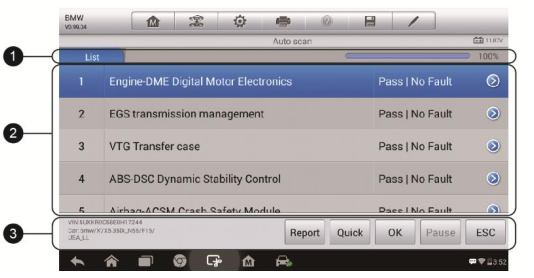
Auto Scan
The Auto Scan function performs a comprehensive scanning over all the
ECUs in the vehicle’s systems in order to locate and retrieve DTCs. The
sample operation screen of Auto Scan displays as below:
1. Navigation Bar
2. Main Section
3. Functional Buttons
Navigation Bar
List Tab – displays the scanned data in list format.
Progress Bar – indicates the test progress.
Main Section
Column 1 – displays the sequence numbers.
Column 2 – displays the scanned systems.
Column 3 – displays the diagnostic marks indicating different conditions of
the test result:
Indicates that the scanned system may not support the code
reading function, or there is a communication error between the
Display Tablet and the control system.
Indicates that the vehicle control system has been detected, but
the Display Tablet cannot accurately locate it.
Fault(s) | #: Fault(s) indicates there is/are detected fault code(s)
Figure 4-10 Sample Auto Scan Operation Screen27
present; “#” indicates the number of the detected faults.
Pass | No Fault: Indicates the system has passed the scanning
process and no fault has been detected.
Column 4 – tap the ○ > button to the right of the test result if you want to
perform further diagnosis and other test activities. A Function Menu screen
shall then display.
Functional Buttons
The table below provides a brief description of the Functional Buttons’
operations in Auto Scan
Control Units
This option allows you to manually locate a required control system for testing
through a series of choices. Please follow the menu driven procedures and
make proper selection each time. The program will guide you to the
diagnostic function menu after a few choices you’ve made.
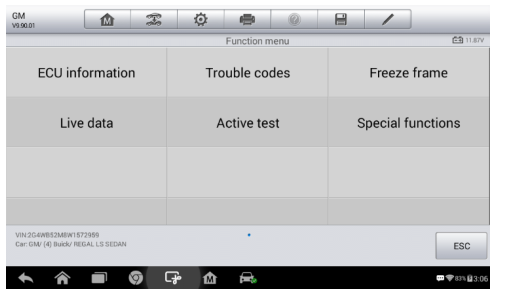
The Function Menu options vary slightly for different vehicles. The function
menu may include:
ECU Information – provides the retrieved ECU information in detail. Tap
to open an information screen.
Trouble Codes – includes Read codes and Erase codes functions.
Displays detailed information of DTC records retrieved from the test
vehicle’s ECU and erases DTC records and other data from the test
vehicle’s ECU.
Freeze Frame – displays the freeze frame data of the DTCs.
Live Data – retrieves and displays live data and parameters from the test
vehicle’s ECU.
Active Test – provides specific subsystem and component tests. This
selection may appear as Actuators, Actuator Test, or Function Tests,
etc., and the tests options vary depending on the manufacturer and
model.
Figure 4-11 Sample Function Menu29
NOTE
With the diagnostic toolbar on top of the screen throughout the whole
diagnostic procedures, you are allowed to make various controls of the
diagnostic information at any time, such as printing and saving the displayed
data, getting help information, or performing data logging, etc.
To perform a diagnostic function
1. Establish communication with the test vehicle.
2. Identify the test vehicle by selecting from the menu options.
3. Select the Diagnosis section.
4. Locate the required system for testing by Auto Scan or through
menu driven selections in Control Units.
5. Select the desired diagnostic function from the Function Menu.